Ahh the settings. It’s actually some mysterious code I haven’t bothered entirely to figure out yet. But you can reverse engineer it. And you can make it do cool stuff that isn’t possible in the menus.
.
You can do stuff like:
Set an exact cm/360 or in/360 for your mouse at any DPI
Stop VOIP from drowning out footsteps
Disable the console (do you hate hitting that key by accident?)
Set RGB values for hitmarkers
Set your screen ‘safe area’ (Tryhards sometimes like to do this to bring the HUD, map etc closer to the centre of the screen.)
Keybinding magic… I’m going to demonstrate how to find out what code you need to use to represent your key/mouse button, how to assign that code to the action you want, how you can transplant actions from one section to another.
Fix hidden, missing or duplicate keybindings. (useful for people using a controller since the Winter Patch)
Use a joystick hat to freelook without holding another button, by making duplicate bindings
Have the spot button be different depending on the vehicle
Find out what those options mean for the sound and graphics quality
Find out what stuff you probably shouldn’t mess with
I’ve got requests for all this so I figured I’ll just show you how I would do it in one post… Well, thread. This is gonna be a long one. Expect updates in the next 24 hours.
. And I’m just gonna say it right now clear as day: Do not do any of this stuff. Your computer may explode and you’ll be banned 4 lyfe and it will be all your own fault.
Alright I’ll start with the PROFSAVE file, because this one is easy. You probably shouldn’t touch it. This is not a text file, and it is not designed to be edited. It contains some game-time settings and apparently the saves for singleplayer. All of the settings are exposed in the menus, so there’s no point changing anything in here anyway. But there are some exceptions:
.
An option called PhysicsQuality, which is at maximum value and I’m sure would have a slider in the UI if we were meant to change it, so don’t.
RGB colour values for crosshairs and other UI elements, which could be handy if you wanted to be more precise than the UI allows, but really, the UI lets us get close enough, right?
An option called EnableConsole, which, as the name suggests, can disable the console. Now, again, I’m sure there is a reason why this is not made an option in the settings. Probably for reasons of being able to support the game. So you shouldn’t really mess with it. However, I am aware that some people have unusual requirements from their hardware (such as for medical reasons) and as such, I’ll explain how to do this.
.
I recommend using notepad++ to edit all these files, and these instructions will assume that you do. The game must not be running when you do this.
Open the PROFSAVE file and either use CTRL+F or your eyes to find ‘EnableConsole’. You will notice lots of weird stuff in the file like NUL NUL NAK SYN STX. I told you this wasn’t a normal file
After this keyword, you will see a few of the strange characters, and then a number 1. Change that 1 to a 0, don’t change anything else.
Now open PROFSAVE_backup and repeat this process.
Save the files, start the game, hit `, nothing happens.
And one last time, I don’t recommend this. If you’re able to avoid it, just don’t hit the button.
.
Really, there’s not a lot of interest there. Possibly some potential for hacking singleplayer or something stupid but that’s not why we’re here, and is just another reason you shouldn’t change this file. Heck, it might even get you banned for hacks. I don’t know. The ability to be precise with RGB colours isn’t a biggie, not worth the bother… Disabling the console is not important to most of us… And I know what some of you are thinking - Hey, PhysicsQuality, if I turn that DOWN, maybe the game will use less CPU?! Ahh. Dude just no. Again, there are REASONS why devs leave things hidden. Sometimes it’s because they just didn’t finish it yet or it was blocked by copyright or sometimes it’s because it will crash your game or melt your hardware into a smouldering science fair volcano. Just don’t.
Next up PROFSAVE_profile. In short, this contains your audio and video settings. Some of them are self explanatory, some of them are a little mysterious - but we’ll shed light on that in a minute. I’m just going to list them out with a quick description where possible, and go into detail where necessary. Those marked with are exposed in the menus, those marked with are not.
.
GstAudio.Announcer_Voice 0/1 “We have lost objective apples” - boy or girl?
GstAudio.AudioLanguage 0-? Your native language. All I know is English is 0 and I don’t mess with it because I don’t want to learn a new language just for BF1. No touchy.
GstAudio.AudioQuality 0-3 Automatically calculated by the game based on your hardware. Every modern PC seems to get a 3. 4 does nothing extra. < 3 reduces quality at no performance gain. Leave it as-is.
GstAudio.CarRadio ?-? Let me know if you figure it out. Hahah seriously I have tested heaps of stuff and come up blank. Maybe does nothing.
GstAudio.DialogueVolume 0-1 The volume of the speech in the game - not call-outs or voip, but stuff like…
GstAudio.InGameMother 0/1 “We have lost objective apples”
GstAudio.IsATMOSOptionEnabled 0/1 Pretty obvious
GstAudio.MicrophoneVolume 0-1 The volume of your mic. Turning this up risks nasty distortion, turning it down means you’ll be drowned out by the game. Don’t change this, fix your mic.
GstAudio.MusicVolume 0-1 Pretty obvious
GstAudio.MyTeamSpeaksMyLanguage 0/1 Say you’re on the German team. You ask for ammo. Does your guy say “Hey I need ammo!” in your language, or does he say… Whatever’s German for “hey I need ammo!”
GstAudio.SoundSystemSize 0-?? Automatically calculated by the game based on your hardware. I’ve never seen it anything other than 20. This is a count of how many channels are used by the audio engine. AYYY moar channelz = moar surround soundz ayyyyyy no. Not that kind of channel. This isn’t channels as in, each channel serves a different direction the sound can come from. This is channels as in, how many simultaneous sounds can be played at once. You don’t want to set it to 51 for 5.1 channels, or 60 for 6 channels, or anything like that, it’s not that kind of channel. There are some strict rules about this setting, like we know it should be multiples of 5, but there is little known about it, and no measurable benefit has ever been seen from straying from the defaults.
GstAudio.StereoMode 0/1 Stereo or surround? “Well DUH surround of course I am MLG pro and need to hear teh footstepz directionz” Hold up bro. You’re right, positional audio is super important. But setting this to surround doesn’t mean it’ll be any better. If you are actually using surround hardware - meaning, you have 6 speakers set up around your room, or one of those headsets with 9000 drivers in each ear; AND you’re either using an optical cable and something with a dolby logo on it, or you’re using 6 separate audio cables out of your PC… Definitely, set that sucker to surround. The game will output sound across 4 speakers, use the front speaker for dialog (Hey I need ammo!) and drive the subwoofer with bassy stuff like explodey tanks. All correct. But what if you don’t have a saiyan headset or a swag hifi system, what if you’re using 2 speakers like most gaming headsets? Well, there are two concepts you should be familiar with. Firstly mixing. This is just adding two sounds together, no magic. Also, psychoaccoustic effects. You know how frogs can ‘throw’ their voice, and when you hear it, it sounds like it’s coming from somethere else? OK that. Now firstly we have features like dolby prologic. PL is meant to take a stereo sound, and then use some dolby magic to flesh that sound out into surround sound. We have no use for such a feature because the game can output in surround, natively. This feature is meant so that your music or old stereo movie sounds good on your 6-speaker hifi. Then there’s dolby headphone, razer surround, etc. What these do, is take a surround input, and then, according to where the sounds are, use the frog’s trick to make it sound like it’s coming from behind you (or wherever) when it’s actually coming from right next to you. Then it mixes the sounds into stereo. This makes the sounds in 2 channels (left and right ears) sound like it has more direction to it. Many surround gaming headsets use this approach. They will take a 6-channel input from an optical cable, then use psychoaccoustic effects to make that appropriate for the 2-speaker headphones. Now, if you have such a gaming headset, or use razer surround, or whatever your setup is, you may consider using surround mode in-game, and having your signal chain convert that to your 2 speakers. However, consider this: Stereo mode outputs from the game in 2 channels, but it does not simply mix all of the game sounds into 2 channels. The game applies it’s own psychoaccoustic effects, to provide a virtual surround sound just as the above setups do. Buuuut, and this is important - the game knows a lot more about what’s happening in-game. razer, dolby, turtle beach, astro may have excellent ways to process surround into stereo, but they don’t know the difference between two different tanks passing you or whatever.
The TL;DR of all this is, if you don’t have 6 speakers, and you want directional sound, you’re gonna have to fake it, and you should let the game fake it, because it knows the sounds best and will produce the most accurate fake. Set the game to stereo and turn off all external processing. If you have 6 speakers, put it on surround.
GstAudio.VOIPVolume 0-1 Volume of ingame VOIP
GstAudio.VOLanguage 0-? Voiceover language. Not exposed in the menus, it seems to follow your language as set above. Tinker with this at your own risk.
GstAudio.VOSubtitles 0/1 Show subtitles for voiceovers?
GstAudio.VoipOn 0/1 Enable/disable ingame voip. Insert some argument about teamwork vs twelvies eating doritos in the mic
GstAudio.VoipVolumeReduce 0/1 Handy hidden feature… Maybe. Normally, when someone talks on VOIP, the game sound volume is reduced to ‘make room’ for their voice. With this set to the default 1, then you weill have no problem hearing callouts in chat, but if you’re sound-¯_(ツ)_/¯ and someone screams it can be a problem as they drown out the game sound. You can set this to 0 to disable attenuation of game audio for chat. The drawback is that you now lack dynamic range and the game and VOIP can/will both cause distortion. Whether you’d gain anything is a subject for lengthy debate by audio nerds.
GstAudio.Volume 0-1 Overall volume of overything.
GstAudio.YourSoundSystem 0-3 Speaker size. Nobody is sure what this means exactly but it’s generally assumed to be a highpass filter cutoff frequency. 3 for ‘Large Speakers’ seems to be the most full sound, but if you’re playing on apple earbuds you won’t do yourself any favours by lying to the game about it You’ll wind up not being able to hear close footsteps because of the boom of a distant exploding tank, stuff like that. Set it to whatever is appropriate. But what about wartapes? Well basically wartapes is a compressed version of the normal sound. This means that the loudest bits are cut off, and the whole thing is turned up to compensate. This is really good for hearing quiet sounds. SOMETIMES. The trouble is, if there is a loud sound (explodey tanks again) and a quiet sound (footsteps behind you) at the same time, then those sounds are mixed together. The compressor cuts of the loudest bit, which is mostly explodey tank, and also partially quiet footstep, sine they’re mixed together, and then turns everything up. So… You don’t actually gain anything here, and in fact, you will lose some audibility. It’s a trade-off and it’s a matter of personal taste. The theoretical optimum is to not use wartapes, and to tune your audio system such that quiet sounds are easily audible (read: good quality, well-matched DAC,amp,speakers) In practice, you may prefer wartapes.
.
.
.
GstRender.AmbientOcclusion 0/1 Makes shadows more realistic with a small performance hit. With this off, sometimes you will get shadows where you shouldn’t, or vice-versa.
GstRender.AnisotropicFilter 0-4 See initfs section below
GstRender.AntiAliasingDeferred 0-2 See initfs section below. It’s antialiasing, but not the one in the menus… and all tests show that i’s not doing a lot, if anything.
GstRender.AntiAliasingPost 0-3 See initfs section below
GstRender.Brightness 0-1 Brightness. Turning it up makes dark stuff more visible and bright stuff less visible, and vice-versa. Leave it at 0.5
GstRender.ClampGpuMemory 0/1 Limit the amount of memory the GPU can use. Turning the limit off, will give higher quality, but might be too much for older hardware. Shouldn’t effect framerate, so no point turning it on to gain framez. Edit: More info here: https://forums.battlefield.com/en-us/discussion/comment/764015/#Comment_764015 TL;DR this setting reduces your textures, lighting and effects settings to High/Med/Low for 4GB/2.5GB/1.5GB of video memory.
GstRender.ColorBlindMode 0-2 Probably best to mess with colourblind settings, in the menus where you can see what works.
GstRender.ConsoleAntiAlias 0/1 Not an antialiasing option for the game. Other than that… Anyone?
GstRender.Contrast 0.500000 What it says. Turning this up will make your colours pop and drown stuff out in bright and dark areas. Not recommended. Fix your screen instead.
GstRender.CyclicCrashPrevention 0/1 Not entirely sure what this is. I have a few solid theories, and all of them have the same punch-line: Don’t change this setting.
GstRender.Dx12AutoDetect 0/1 Self explanatory. If you want to use DX12, set it in the menus.
GstRender.Dx12Enabled 0/1 Self explanatory. If you want to use DX12, set it in the menus.
GstRender.Dx12KillSwitch ? I have no idea what this does. Why? Because it’s called “KILLSWITCH”. You flip it on your own PC. No, don’t. I file this squarely in the “there’s a good reason this isn’t in the menus” folder.
GstRender.EffectsQuality 0-3 See initfs section below
GstRender.Enlighten 0/1 There are mentions of ‘enlighten’ as a feature of the game engine, but either setting here makes no difference to performance or quality. Initfs seems to hard-code this to 1, which explains the lack of difference in changing this setting.
GstRender.FieldOfViewScaleADS 0/1 With this off, 1x zoom is 55ish, 2x is half that, 4x is half that, so on. With this on, 1x is your FOV, 2x is half that… and so on… The menus lie though, they say this is only for iron sights. It will effect all infantry sights, but does not effect vehicles (including cavalry when mounted only, fixed guns etc)
GstRender.FieldOfViewVertical 0-105 Degrees of view between the top and bottom of your monitor. “hor” conversions show the horizontal field of view, assuming a 4:3 monitor, and are not accurate for 16:9. Set according to taste. Lower FOV increases visibility at range, higher FOV increases peripheral vision.
GstRender.FieldOfViewVerticalVehicle 0-95 As above but for vehicles. Generally, you want this at maximum. It’s best for dogfighting, allows you to see further behind/around your tank in 3P, etc. As vehicle zoom is not effected by ADS scaling, you can still see longer distance if you need to.
GstRender.FullscreenEnabled 0/1 Fullscreen or windowed mode?
GstRender.FullscreenMode 0 Fullscreen, windowed or borderless?
GstRender.FullscreenRefreshRate 0-? Refresh rate of your screen. Don’t mess with this, use the menus.
GstRender.FullscreenScreen 0 The screen, like desktop, basically the physical display or displays the game will use (also includes virtual displays like nvidias screen scaling). Don’t mess with this, use the menus.
GstRender.HighResUIScaleFactor 0-200 The size of UI elements on screen. Scaling this up is good for large screens (like bigscreen TVs)
GstRender.LightingQuality 3 See initfs section below
GstRender.MaxVariableFps 4 FPS limit. Setting this in game can result in smoother gameplay as you can prevent the game from working hard to draw frames you’ll never see on screen, freeing resources for other tasks. 0=Display refresh rate, 1=60, 2=120, 3=144, 4=200/no limit
GstRender.MeshQuality 3 See initfs section below
GstRender.MotionBlur 0-1 Amount of motion blur.
GstRender.MotionBlurEnabled 0 Is motion blur enabled entirely? Setting the above to 0 seems to have the same effect as disabling, but if you’re a purist and want it to definitely be off, there’s this.
GstRender.OverallGraphicsQuality 5 See initfs section below
GstRender.PostProcessQuality 0 See initfs section below
GstRender.ResolutionHertz 0-? Screen refresh rate for windowed mode
GstRender.ResolutionScale 0-2 Resolution scaling basically makes the game run at a higher resolution, then scale down to your monitor. This results in much better graphics quality, at very high cost in performance. A scale around 125-133% will provide a visible improvement in quality, but that return drops off between there and 200%, where there is another significant improvement - however running at 200% scaling is far too costly in performance, to be worthwhile. Similarly, you can run a lower resolution scale, say 80%, and the game will run at a lower resolution, providing higher framerates on older hardware, et the expense of significant aliasing and loss of quality all round. Balance according to your needs.
GstRender.ScreenSafeAreaHeight 0-1 Sometimes, TV screens cut off the edges of the picture. If tht happens in-game and you lose part of your HUD, that’s bad. So, there is this option, which is usually exposed in menus but for some reason isn’t in BF1. Imagine you draw a box around your HUD elements. These numbers control the size of that box. That way you can make sure it isn’t cut off by your TV’s overscan. It’s also useful though, for pushing important HUD elements closer to the centre of the screen where you’re looking. Say, you set these to 0.800000, then the safe area will be at 80% of your screen size, pushing the minimp and ammo count, closer to the crosshair for easy reference. Personal taste.
GstRender.ScreenSafeAreaWidth 0-1 See above
GstRender.ShaderQuality 0-2? A mystery. Possibly another automatically generated value based on hardware. Values above 2 do not provide any difference but below 2 does degrade quality without any performance gain. I’d say leave this.
GstRender.ShadowQuality 3 See initfs section below
GstRender.StereoConvergence 0-1 For 3D.
GstRender.Stereoscopy 0/1 For 3D.
GstRender.TerrainQuality 3 See initfs section below
GstRender.TextureFiltering 3 See initfs section below
GstRender.TextureQuality 3 See initfs section below
GstRender.TransparentShadows 1 See initfs section below
GstRender.UndergrowthQuality 1 See initfs section below
GstRender.VSyncEnabled 0/1 Vsync prevents tearing (where your monitor shows half of one frame and half of another frame, at the same time) at the expense of input lag, framerate, etc. Personal taste.
GstRender.WeaponDOF 0/1 Apply depth of field effects to weapons. Basically this means, does the gun get blurry when you hold it up to your face like it would IRL. However there’s a catch here. When using scoped weapons, the area outside of the scope is blurred when you ADS. With this option off, that area is now as clear as the area inside the scope.
GstRender.WindowBordersEnable 0/1 Always seems to be set to 1, even with borderless mode. No benefit in toying with this if your mode works as intended.
Very sorry for the delay in completing this. IRL just never works out according to plan does it? Anyway here we go, PROFSAVE_profile_synced.
This file is basically all your settings to do with input devices and keybindings, so it has some useful applications that allow customisation that can really give you an edge in game, and notably, can provide a manual ‘fix’ for some bugs in the game.
.
For this file, I’ll be splitting it into two posts. First off I’ll cover the options, and then the keybindings section specifically, in another post. I’ll follow the above convention of for items visible in the menus and for items hidden
.
You may note that I have been unable to pin down the use of some of these settings (three of them so far). Some, I know aren’t used any more, so perhaps the mystery settings fall into this category. Perhaps they only effect consoles, perhaps I have missed something… But rest assured, I spent at least an hour testing each of these mystery settings before giving up and saying “I don’t know”. I’ve tested interaction between devices, response from the game, framerates, CPU usage, memory usage, load times, latency… And with any of them I have seen no change. I think it’s best to assume these don’t do anything, and leave them at their stock setting. I’d be very happy to be corrected, if you can figure out what they do, but be wary of any advice you might see around the interwebs saying that you should change them. If you don’t see proof - and that doesn’t mean “lots of people said it works” - just leave it alone… because as you will soon discover, there are a few examples in this file which have been widely reported to have an effect which they simply do not.
GstInput.Deadzone 0-1 No longer in use. See Jjju’s posts here: battlelog.battlefield.com/bf4/forum/threadview/2955064769635367586/ You can set this as you wish, but it doesn’t do anything any more. It does not effect either joystick or mouse. If you really want to set it to zero, I guess it won’t hurt anything, but I’ve tested it and it makes no difference. Feel free to correct me if you have any proof otherwise.
GstInput.DeadzoneCentre 0-1 Sets the deadzone for joysticks. I’m going to go a bit indepth here, to dispell some myths regarding this setting, most notably that it (and the above setting) effects input lag on mice, which it does not. EE nerds, I am trying to keep it simple. This will not be entirely technically correct.
.
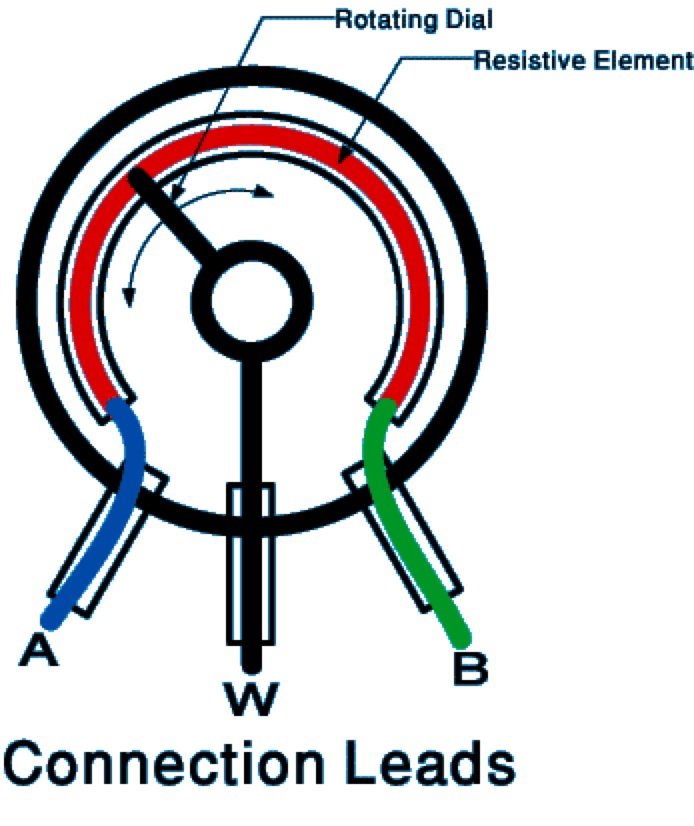
Joysticks work, by using an electronic component called a “potentiometer”, also known as a “variable resistor”. This latter name, gives us a hint at what it does - it resists the flow of electricity, in a varying amount. You set this amount, by physically moving a part of the component, usually a knob. You’ve seen this in old hifi’s and clock radios. When you turn the volume knob all the way down, you are turning the resistor all the way up. It resists the flow of electricity going to your speakers, so the sound is quiet. The joystick works in the same way. It has two of these, one for the Y axis and one for the X axis, attached to the thumbstick. Here’s a good image showing this:
The potentiometers, are the two brass things on the sides. Note the three connectors on each of them. So, what does a potentiometer (aka a ‘pot’) do? Let’s take a look at this picture:
Put very simply, the electricity comes in where the blue line is. It travels over the red line, but this red line is a material that resists the flow of electricity, so it’s trying to find a way out, as with anything it will take the path of least resistance. It can get out through the green line, but it will have to pass through all that resistance to get there, so, it will try to take the black line instead. When you move the knob, you move the ‘wiper’ (yep that’s why it’s labelled ‘W’) across the resistive material, and this means that the electricity has to travel through more, or less, of the resistive material on the red line, before it escapes. The result is that you have a kind of ‘voltage splitter’ (or voltage divider for the nerds). A chip then reads the voltage, and knows where the knob is positioned, based on the voltage which is output. But these things aren’t perfect. Small variations in the thickness of the resistive material, humidity in the air, the mechanical connection from the stick to the pot, and tiny variations in the amount of voltage going into the device… there are a zillion little things that can go wrong. So, finding the centre, is not always so simple.
.
We can see the effects of these imperfections easily, by setting our deadzone to zero. When you do this, these imperfections mean that the game will think you are moving the stick, even when you aren’t touching it, and your soldier will slowly move or look around. What the deadzone does, is to ignore any input that is close to the centre of the movement of the stick. This way, if you have your stick in the centre (as determined by the springs and stuff inside the joystick). You soldier will be still. This ‘DeadzoneCentre’ setting in BF1, controls how close to the centre, the input should be, for the game to ignore it. A larger deadzone, means that the stick must move further from the centre, before the game recognises the input and moves your soldier. A smaller deadzone will give you more responsive input… but if you make it too small, then you will get ‘stick drift’. Every joystick is different, so you should tune this to be as low as possible, for your joystick. The default of 22% (0.220000) is a safe setting for almost all sticks, so you should be able to turn this down. With my rather old and beat-up xbox one controller, I can have it at around 10% (0.100000) but if I go lower, it will drift. Your mileage may vary. By using the menus you can set this to any integer percentage, but if you wanted to really twiddle it, you could set fractions of a percentage by using this setting. It shouldn’t really be necessary, but… It’s your PC!
GstInput.FreelookSensitivity 0-1 The name suggests that this will alter your sensitivity when using free-look… But honestly I’ve been unable to find any change in behviour no matter how high or low I set this. I’m pretty sure it does nothing. Probably another throwback to an older game, like GstInput.Deadzone is.
GstInput.HeadtrackingEnabled 0/1 OMFG VR SUPPORT! TrackIR! Finally! No. hehehe. This has no effect on PC. See, these settings files actually exist on console, even though you can’t edit them there. In fact, if you look at the initfs file mentioned in the above posts, you’ll see that there is even stuff there for running the game on phones. I am making an educated guess here, but I’m pretty sure this is for the xbox one kinect, which does allow head tracking, for peek/lean and freelook. It may also be re-purposed for the PS4 controller which provides freelook/lean via accelerometer. Doesn’t work on PC though. But yeh, EA develop their games for PC first, right. Ahem, moving on…
GstInput.HoldButtonToZoom 0/1 Click to ADS/zoom, or hold to ADS/zoom?
GstInput.HoldButtonToZoomVehicle 0/1 As above, in vehicles.
GstInput.HoldForBreathControl 0/1 Click to hold breath when using a sniper rifle, to steady your scope, or hold?
GstInput.InputMethod 0-? Honestly… I have no idea. Possibly another console-related setting? I haven’t been able to see any change in behaviour. Was hoping this might help with some of the bad handling between using different types of input device (such as mixing or switching between keyboard+mouse and game pad, etc) but no such luck.
GstInput.IsRightHanded 0/1? Honestly… I have no idea. Possibly another console-related setting? I haven’t been able to see any change in behaviour.
GstInput.JoystickSensitivity 0-4 Sensitivity of joysticks/controller thumbsticks. This basically sets your maximum rate of rotation.
GstInput.JoystickSensitivityVehicle 0-4 As above, in vehicles.
GstInput.LeaningEnabled 0/1 You would think that this controls whether you use the ‘lean’ feature in game, where if you stand close to cover, then ADS, you will ‘lean’ to the side. But it’s not. That setting is in the PROFSAVE file (it’s exposed in the menus, so change it there, don’t edit PROFSAVE for this). In fact, setting this to ‘1’ (usually meaning it’s ON) actually disables both peak and lean features regardless of the seting in PROFSAVE.
GstInput.LeaningSensitivity 0-2 This does not control your aim sensitivity when leaning, but the position you can be in (and change of position) where the peek/lean functions will be engaged. The default is 0.5, but turning it up seems to cause the lean to be more likely to be engaged or stay engaged. Basically, if you turn this up, it can make you peek/lean from further behind cover. Whether this is a good or bad thing, is a matter of personal preference.
GstInput.MouseRawInput 1 Normally, when a windows application such as this game, receives input from the mouse, first it passes through some processing as part of Windows. This can be very useful if you want to make your application ‘just work’ with any input device, but it can impact performance… So, the game allows us to use ‘raw’ input, where the mouse ‘talk’ directly to the game, without Windows acting as an interpreter of sorts. MS can give you the nerdy details, but TL;DR leave this on.
GstInput.MouseSensitivity 0-? Mouse sensitivity. I guess I don’t need to tell you what this does. If you aren’t sure, there are very detailed explanations on the website I’ll mention shortly. In the menus, it is represented as a percentage, but… You can get more precise by setting your sensitivity here. www.mouse-sensitivity.com is an outstanding website which will allow you to get exact figures to paste in here, to get the EXACT sensitivity you want. Punch in the information you need, such as the cm/360degrees, mouse DPI, etc, and it will spit out a number for you to paste here. For a measly 2 bucks, you get a month’s subscription to the site (and you can just take one month if you don’t want to renew it evey month, or pay less per month and sign up for a year if you like) and this will allow you to match your sensitivity exactly between all of your games, and all of your weapons, scopes, vehicles, everything. No, I have no affiliation with the site, it’s just that good. If you don’t pay for a sub, the site will still work with some more advanced features missing. Check it out.
GstInput.MouseSensitivityVehicle 0-? As above, but for vehicles. Note that the www.mouse-sensitivity.com website will allow you to perfectly match your vehicle aim to your infantry aim. Very handy. Yes, I’m still blabbing on about how good that website is. If you’re not using it, you probably should at least check it out, I’m sure you’ll like it. The forums alone are very informative.
GstInput.PcPadLayout 0-? Another setting that seems to have no effect, possibly console-related. Doesn’t change behaviour of game pads in any way I could notice from testing.
GstInput.Scheme0Buttons 0-4 See below
GstInput.Scheme0FlipCameraY 0/1 See below
GstInput.Scheme0FlipY 0/1 :MX: See below
GstInput.Scheme0Sensitivity 0-2 See below
GstInput.Scheme0Sticks 0-4 See below
GstInput.Scheme1Buttons 0-4 See below
GstInput.Scheme1FlipCameraY 0/1 See below
GstInput.Scheme1FlipY 0/1 :MX: See below
GstInput.Scheme1Sensitivity 0-2 See below
GstInput.Scheme1Sticks 0-4 See below
GstInput.Scheme2Buttons 0-4 See below
GstInput.Scheme2FlipCameraY 0/1 See below
GstInput.Scheme2FlipY 0/1 :MX: See below
GstInput.Scheme2Sensitivity 0-2 See below
GstInput.Scheme2Sticks 0-4 See below
GstInput.Scheme3Buttons 0-4 See below
GstInput.Scheme3FlipY 0/1 :MX: See below
GstInput.Scheme3Sticks 0-4 See below
GstInput.Scheme4Buttons 0-4 See below
GstInput.Scheme4Sticks 0-4 See below
For these, the ‘schemes’ represent what the player is controlling. They are as follows:
0 - Soldier
1 - Land Vehicles
2 - Air vehicles
3 - Horse
4 - Transport
.
For the ‘Buttons’, we have five options as follows:
For soldier/horse:
0 - Default
1 - Lefty
2 - Alternate
3 - Lefty Alternate
4 - Custom
For vehicles:
0 - Default
1 - Lefty
2 - Veteran
3 - Lefty Veteran
4 - Custom
.
For the ‘Sticks’, we have:
0 - Default
1 - Legacy
2 - Default Southpaw
3 - Legacy Southpaw
4 - Custom
If you choose ‘custom’ under buttons or sticks, the game will use your keybindings menu, to bind your control inputs. At present, the game is buggy, and if you want to use a controller or joystick, you MUST use custom, and bind the inputs manually. I will go into more detail on this, in the following posts regarding the keybindings.
.
For ‘FlipY’, this ‘Flips’ the Y axis, most often referred to as ‘look inversion’. This mean that if you pull your mouse/thumbstick towards you (‘down’), your character will look up (This is normal in aircraft, you’re heard the expression “pull up?” This is a throwback to when aircraft used a set of wires and pulleys attached to the control stick and flight control surfaces) You may have noticed that these are marked as being in the menu and also not in the menu. Wat? Well, the thing is that there is an option in the menu for look inversion, but it’s not as granular as editing it in the file. If you set look inversion for planes, it will only effect Scheme2, but if you set look inversion for the soldier, then it will effect all of the other schemes. Perhaps, you want look inversion for the soldier and not for the tank. Manually editing these settings will allow this, where it is not possible by using the button in the menu.
.
For FlipCameraY, this allows us to use look inversion for freelook, but not for control of the vehicle. This is a matter of personal preference. When you freelook in a vehicle, it will use whatever setting you have for your soldier. You can invert that, using this setting.
.
GstInput.SoldierZoomSensitivityAll 0-2 This controls your sensitivity when ADS or zoomed in. It will act as a multiplier of your base sensitivity (hipfire or vehicle sensitivity)
GstInput.SoldierZoomSensitivity10x00 0-2 See below
GstInput.SoldierZoomSensitivity1x00 0-2 See below
GstInput.SoldierZoomSensitivity1x25 0-2 See below
GstInput.SoldierZoomSensitivity1x50 0-2 See below
GstInput.SoldierZoomSensitivity2x00 0-2 See below
GstInput.SoldierZoomSensitivity2x50 0-2 See below
GstInput.SoldierZoomSensitivity3x00 0-2 See below
GstInput.SoldierZoomSensitivity3x50 0-2 See below
GstInput.SoldierZoomSensitivity4x00 0-2 See below
GstInput.SoldierZoomSensitivity5x00 0-2 See below
GstInput.SoldierZoomSensitivity6x00 0-2 See below
GstInput.SoldierZoomSensitivity8x00 0-2 These are similar to the above, but specific to each scope (10x, 1x, 1.25x, etc etc). If you really like to use these, go for it, but I STRONGLY recommend leaving them at defaults and instead using Uniform Soldier Aiming. More on UsA later…
GstInput.SoldierZoomSensitivity1 0-2 See below
GstInput.SoldierZoomSensitivity2 0-2 See below
GstInput.SoldierZoomSensitivity3 0-2 See below
GstInput.SoldierZoomSensitivity4 0-2 These settings control The sensitivity when zoomed in, according to the schemes listed above. These are not usually very useful, with one possible exception. When you zoom in a plane, you get a reduced sensitivity due to the reduced FOV. This results in a slower turn. By turning up the zoom sensitivity on scheme 2, you can maintain your normal turn rate, while zoomed. Mine looks like this: GstInput.SoldierZoomSensitivity2 2.000000
In some tests this didn’t seem to work, and in some it did. Given that turn rate/radius is something of a mystery still (read: speed control IS still a thing, we just don’t know what thing it is exactly), this might not be valuable. If you’d like to test it further I’d be very interested in your results and will update this post with full credit to you.
GstInput.SpeechRecognitionDialect 0/1 See below
GstInput.SpeechRecognitionEnabled 0/1 See below
GstInput.SpeechRecognitionEnabledEnum 0/1 Another suspected xbox-specific setting. On xbox, you can use kinect to give voice commands in place of menus and the commorose. No worky on PC mustard rice.
GstInput.VehicleAimRelativeControl 0/1 When you go ‘forward’ in a vehicle, is it forward according to the way the wheels/tracks are pointing, or forward according to the way the guns are pointing? Recommended on for ease of use (new guys) and off for better control of the vehicle (tryhards)
GstInput.VehicleDecoupleAiming 0/1 When you aim, is that aim relative to the direction of the vehicle or relative to the compass? This will have most effect when you turn the vehicle.
GstInput.VehicleDecoupleAimingPassenger 1/1 As above, for the passengers of a vehicle. Broken in planes.
GstInput.VehicleSensitivityCavalry 0-2
GstInput.VehicleSensitivityDefaultTurret 0-2
GstInput.VehicleSensitivityFieldGun 0-2
GstInput.VehicleSensitivityHMGTurret 0-2
GstInput.VehicleSensitivityHeavyTurret 0-2
GstInput.VehicleSensitivityPlanePilot 0-2
GstInput.VehicleSensitivityTank 0-2 Sensitivity multipliers for specific vehicles
GstInput.Vibration 1 0/1 Enable vibration for input devices such as force feedback joysticks and xbox controllers.
.
Next up: Keybindings! This is a good one because it allows us to fix some bugs in the game and also give us a bit of a competitive edge. I’ve been a bit delayed in this as the patch dropped during testing and added some new parameters, but it’s coming very soon. I’ll bump the thread when I’m done because this is the last section. Phew!
So the keybindings section is last in PROFSAVE_profile_synced. As with the other sections, it’s all arranged in alphabetical order.
Each line represents one parameter for a keybinding entry. Four (or five*) lines together, provide all of the parameters for a keybinding entry.
Each parameter will look like so:
Where: Context - The context in which this keybinding will apply, one of:
[] default - Applies always
[] horse - Applies only when on horse (not as cavalry class on foot)
[] infantry - Applies when a foot soldier. Does not apply once you enter any vehicle including horses, stationary weapons, etc. except the behemoth, where it does apply (since it was changed in the 2nd patch, previously it used hardcoded defaults)
[] jet - Applies in planes. the naming of ‘jet’ is a throwback to previous titles.
[] transport - Applies in transport vehicles such as armoured cars, boats, etc.
[] vehicle - Applies in other vehicles, most notably tanks.
. Action - The in-game action to associate with the input. They are all prefixed with the word “Concept”, so for example, the ‘Fire’ button, is called “ConceptFire”
. Enum - An enumerator (counting up from 0) to allow multiple keys to be bound to the same Action.
In the menus, these are presented as a separate binding for each of mouse, keyboard, gamepad, joystick… But it does not HAVE to work that way. That is to say, mouse is not always represented by 0, the keyboard is not always 1, etc. .. There does not seem to be a specific mapping of device to enumerator. For example, you can have two separate keys bound to sprint, or two mouse buttons which both fire. Likewise there does not seem to be any (reasonable) limit to the counter, so, while the menus provide for entry of four inputs to bind to each action; one for each type of input device, we can add (and remove)further bindings which are not visible in the menus at all. It’s as though there are more, hidden columns in the keybindings menus. These hidden keybindings have been the source of bugs and can be remedied by editing them.
. Param - Each keybinding 4 consists of parameters,
[] axis - See description under ‘button’
[] button - You are best to reverse-engineer these parameters, as the combination of the ‘axis’ and ‘button’ pair, identify the hardware attached to your machine, and may differ from mine. Unlike most of the contents of this file, the names are entirely misleading. Axis doesn’t necessarily represent a joystick or mouse axis of movement. Instead it seems to identify which physical device the input is from, or at least part of that device. For example 0 seems to be keyboard, 24 seems to be the xbox controller - and I don’t mean one of it’s sticks, I mean all of them. Which stick or button, or key on the keyboard, is represented as the number for the ‘button’ paramater. But keyboard numbers don’t seem to follow any standard I can recall. For example, I know that my numpad keys 0-9, which I use to change vehicle seats, are 79,80,81,75,76,77,71,72 (yes, in that strange order). It’s all a little odd and to be honest, that doesn’t concern us… because the best way to find out what values to use for axis and button, is to copy-paste.
An important behaviour to remember, is that if a keybinding entry is missing, that does not mean it does not apply. The game will use default bindings if it cannot find a customised entry. Accordingly, we shouldn’t ever delete one of these entries if it is unwanted, instead, we should overwrite them with a binding to a ‘null’ button. In simple terms, it’s a keybinding, bound to no real key. You can do this by setting the button value to 255 Like so:
GstKeyBinding.vehicle.ConceptFire.1.button 255
Button 64 appears to be a null binding for gamepad controllers.
[] negate - As the name suggests, this will negate the effect of this keybinding. This is often used on a mouse or stick binding, where it is bound to an axis of movement. For example, we see it in use in ‘Pitch’ for infantry - which is looking up and down. As an example, changing it would have a similar effect to enabling look inversion. Again, copy-paste is the best way to determine this value
[] type - This is a reference to the way the game handles the input, not the type of input device. Again it’s best obtained by copy-paste. Hours of experimentation otherwise resulted in the game becoming most displeased with me …
[*] device - This fifth parameter, is usually listed third (because alphabetical order) but I have left it to last because it is always 0. In the case of horse bindings, it is omitted entirely. These two observations lead me to believe this is legacy code from a previous game, which no longer serves any function. As above, the actual physical input device is identified in the axis parameter.
.
So, as you can see, axis and button are important but perhaps not in the manner their names suggest, and copy-paste is your friend.
. Value - Each parameter is then assigned a value, and this pair of paramater and value, “bound” together, is what gives us the key “binding” functions in-game.
.
Let’s use some real-life examples to demonstrate how we can use this file to our advantage. As mention in the OP we will:
Fix hidden, missing or duplicate keybindings. (useful for people using a controller since the Winter Patch)
Use a joystick hat to freelook without holding another button, by making duplicate bindings
Have the spot button be different depending on the vehicle
Sorry the last post is the big one. I’ll have it completed in the next 24 hours. Edit: and then the patch dropped with apparent HDR support and I’ve been delayed with testing… but I am still on the job!
So the keybindings section is last in PROFSAVE_profile_synced. As with the other sections, it’s all arranged in alphabetical order.
Each line represents one parameter for a keybinding entry. Four (or five*) lines together, provide all of the parameters for a keybinding entry.
Each parameter will look like so:
Where: Context- The context in which this keybinding will apply, one of:
default - Applies always
horse - Applies only when on horse (not as cavalry class on foot)
infantry - Applies when a foot soldier. Does not apply once you enter any vehicle including horses, stationary weapons, etc. except the behemoth, where it does apply (since it was changed in the 2nd patch, previously it used hardcoded defaults)
jet - Applies in planes. the naming of ‘jet’ is a throwback to previous titles.
transport - Applies in transport vehicles such as armoured cars, boats, etc.
vehicle - Applies in other vehicles, most notably tanks.
I noticed that, in my case in BFV, the mouse axis x is represented as axis 0, button 8, device 0, neg 0 and type 1. It’s displayed as axis 0, the same as the keyboard. I think that you can use it as an example

 are exposed in the menus, those marked with
 are not.
 for items visible in the menus and
 for items hidden